
Token Switch Intelligent Gateway Platform User Manual
Welcome to Token Switch! This platform is an enterprise-level unified AI service forwarding and management platform designed for large language model application scenarios. You can use a unified interface to call mainstream global LLMs, greatly simplifying development integration costs, improving calling efficiency, and enabling more flexible model selection.
The new version now fully supports "Enterprise Mode", which helps enterprises achieve centralized management of AI capabilities and refined cost control through multi-level organizational structures and refined budget configuration. The platform provides the following core features:
- Model Plaza: Aggregates 100+ most powerful global LLMs, one-stop viewing of various prices and calling details
- Enterprise Management: Supports enterprise real-name authentication and manages enterprise administrators
- Department Management: Supports organizational structure building, department budget allocation, member consumption limits, etc.
- Member Management: Supports unified addition and management of enterprise members who can share enterprise balance
- API Key Management: Provides refined API Key configuration, supports setting quota limits, expiration dates, and available model ranges per project
- Resource Statistics: Provides data dashboards for real-time monitoring of consumption amounts, request counts, and performance metrics to support business insights
- Calling Logs: Millisecond-level tracking of every request's Token consumption, duration, and status, providing precise troubleshooting support
- Account Balance: Comprehensive pre-recharge and balance alert mechanisms to ensure business continuity is not affected by insufficient balance
Quick Start
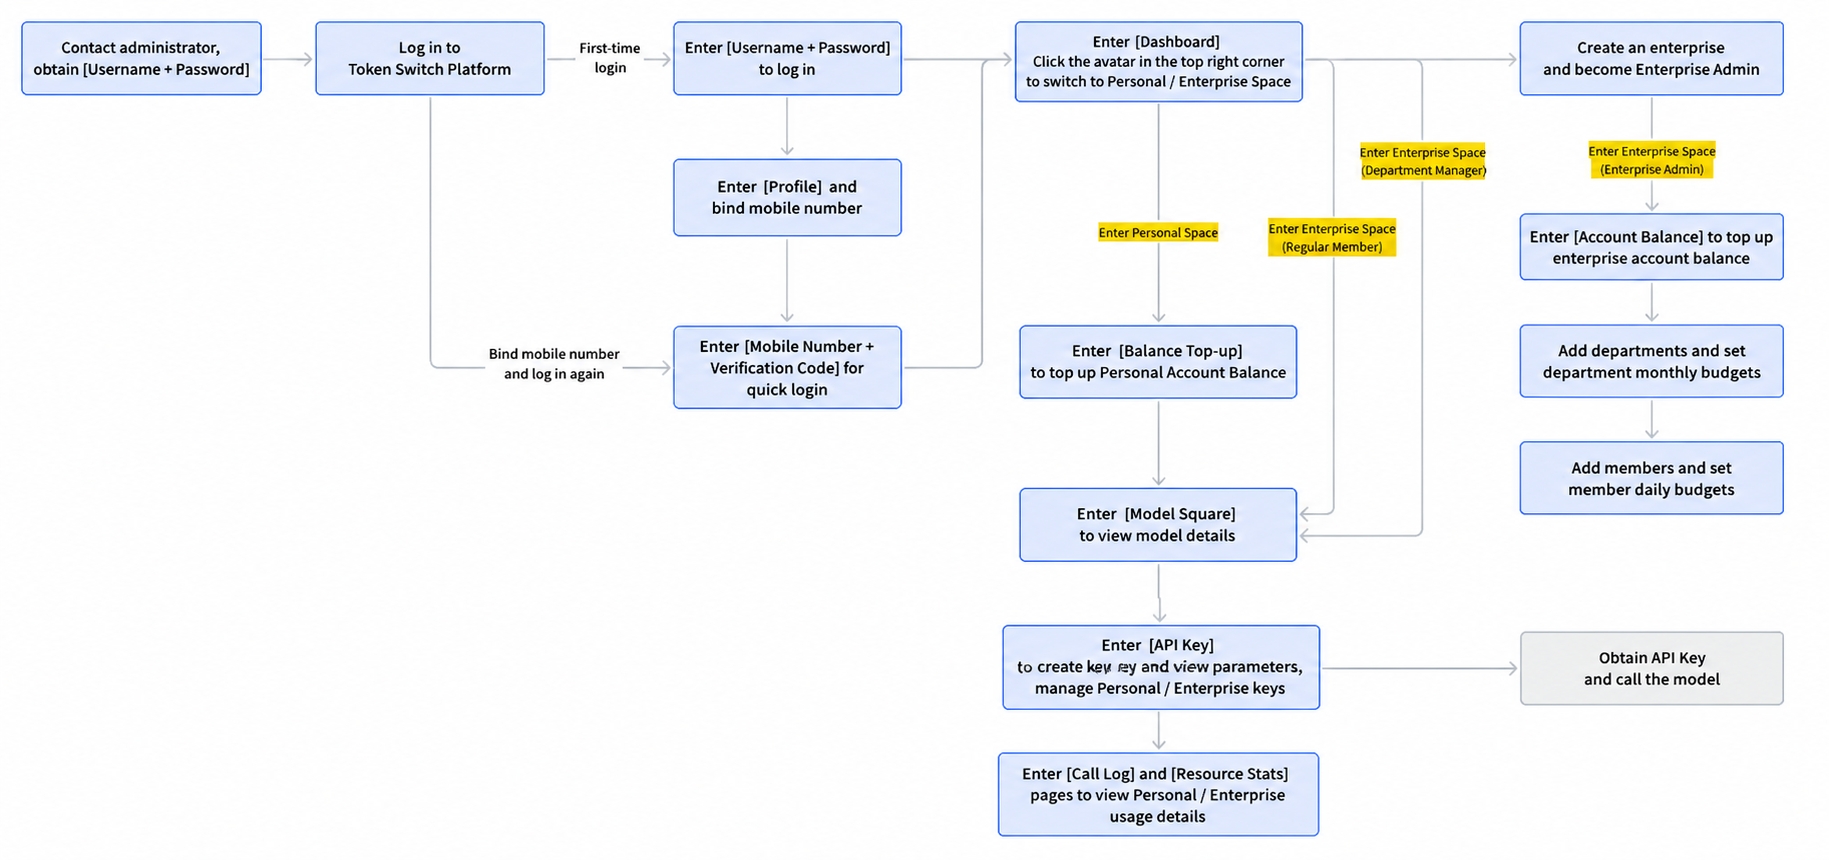
STEP1: Get Account and First Login
- Get Account: ①If you are an enterprise administrator, contact the platform administrator to obtain your initial username and password; ②If the enterprise you need to join has been created, contact your enterprise administrator to add you to the enterprise
- Login to Platform: Go to the Token Switch portal page https://www.neolink.com, click Console/Developer Login/Try Now buttons to navigate to the login page

The platform supports the following two flexible login modes:
- Username/Password Login: ①As an enterprise administrator, please use the username and password provided by the administrator for your first login. After logging in, go to Personal Center and click the Change Password button to reset your account password. ②As an enterprise member, you can use phone number + verification code for your first login

- Quick Phone Login: After binding your phone number in "Personal Center", you can use "Phone Number + Verification Code" for quick login in the future.

STEP2: Select Workspace
After entering the console, click the avatar in the upper right corner to switch workspaces:
- Personal Space: Suitable for independent development and testing. After entering, you need to go to [Balance Recharge] to recharge your personal account before you can start using it.
- Enterprise Space: Suitable for team collaboration. If you are an Enterprise Administrator, you need to complete [Account Balance] recharge first, add your team members in [Member Management], add departments in [Department Management] and set corresponding monthly budgets; if you are a Department Administrator, you can import members who have entered the enterprise in [Department Management] and set corresponding daily budgets; if you are an Ordinary Member, you can directly use resources based on allocated quotas.
💡 You can belong to multiple enterprises simultaneously and switch seamlessly with one click through this menu.

STEP3: View Available Models
- After entering [Model Plaza], users can view the list of models currently supported by the platform, model descriptions, available groups, and pricing information.
- For models that support context-based tiered pricing, the platform will display corresponding prices according to different context length ranges. Before calling, users can understand the input and output prices under different specifications based on the context length required by their business, facilitating cost estimation.
- If the model supports caching capabilities, the page will also display cache creation, cache hit, and other related pricing information, helping users more fully understand model calling costs.
STEP4: Create and Manage API Keys
- Go to the [API Key] page, click "Create API Key", configure key information, and it will be created successfully and ready for use. A single key supports calling all models.
STEP5: Track Calling Details
- Track every request detail in real-time through [Calling Logs]
- Use the [Resource Statistics] dashboard to globally grasp personal or enterprise consumption trends and performance metrics