WorkBuddy Configuration
WorkBuddy is an AI agent assistant by Tencent, in the same family as CodeBuddy (Tencent Cloud Code Assistant) and configured the same way. It supports custom models via models.json and connects to the TokenSwitch platform in an OpenAI-compatible way.
1. Install WorkBuddy
Download and install WorkBuddy or CodeBuddy from the official website and log in. The international site is codebuddy.ai (not accessible from mainland China networks).
Open any project folder (allow the app to create its local configuration directory).
2. Add a Custom Model
Currently only the OpenAI API format is supported for custom models. There are two ways to add one: through the settings UI, or by editing the models.json configuration file directly. Both are equivalent — models added in the UI are written to the local models.json as well.
Method 1: Add via the Settings UI
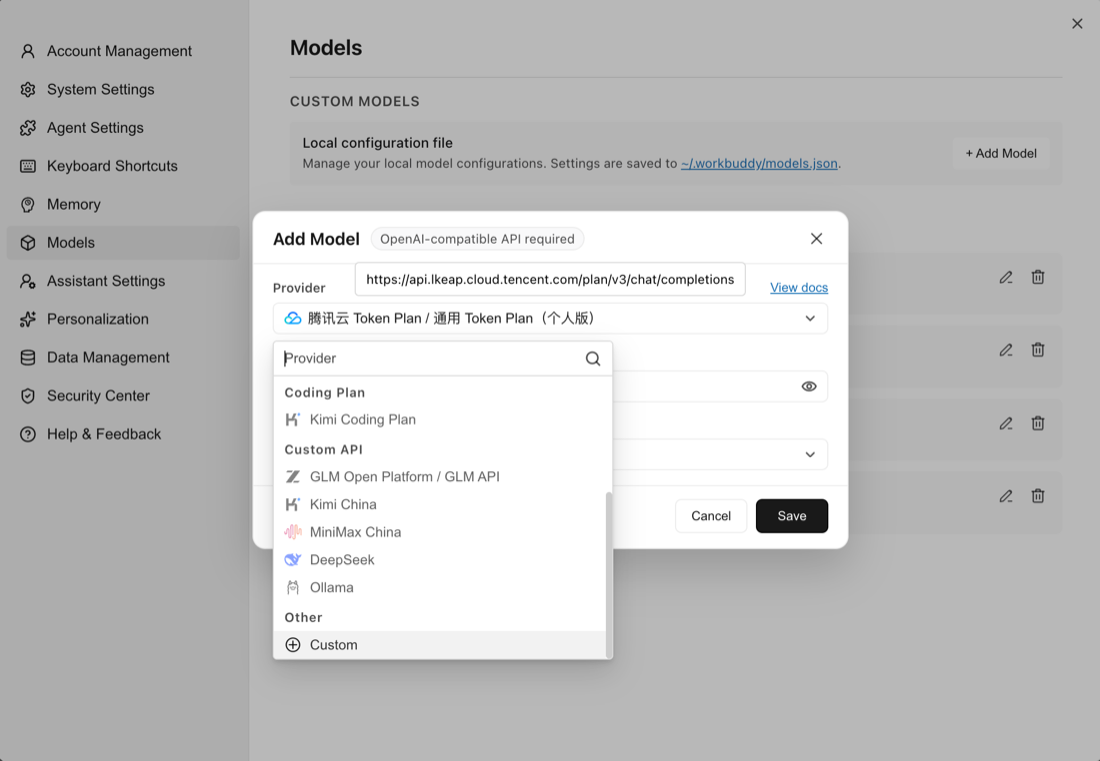
Open WorkBuddy settings, go to the "Models" page, and click "Add Model" under "Custom Models → Local Configuration File";
For "Provider", select "Custom" under the "Other" category at the bottom of the dropdown:
Fill in the form as follows, then click "Save":
Field Description Endpoint + /chat/completions(full endpoint path)API Key Your platform API Key Model Name The model ID copied from the "Portal / Model Marketplace", e.g. glm-5.2Advanced Settings Recommended to check "Tool Calling"; Input / Output lengths can be left empty to use provider defaults 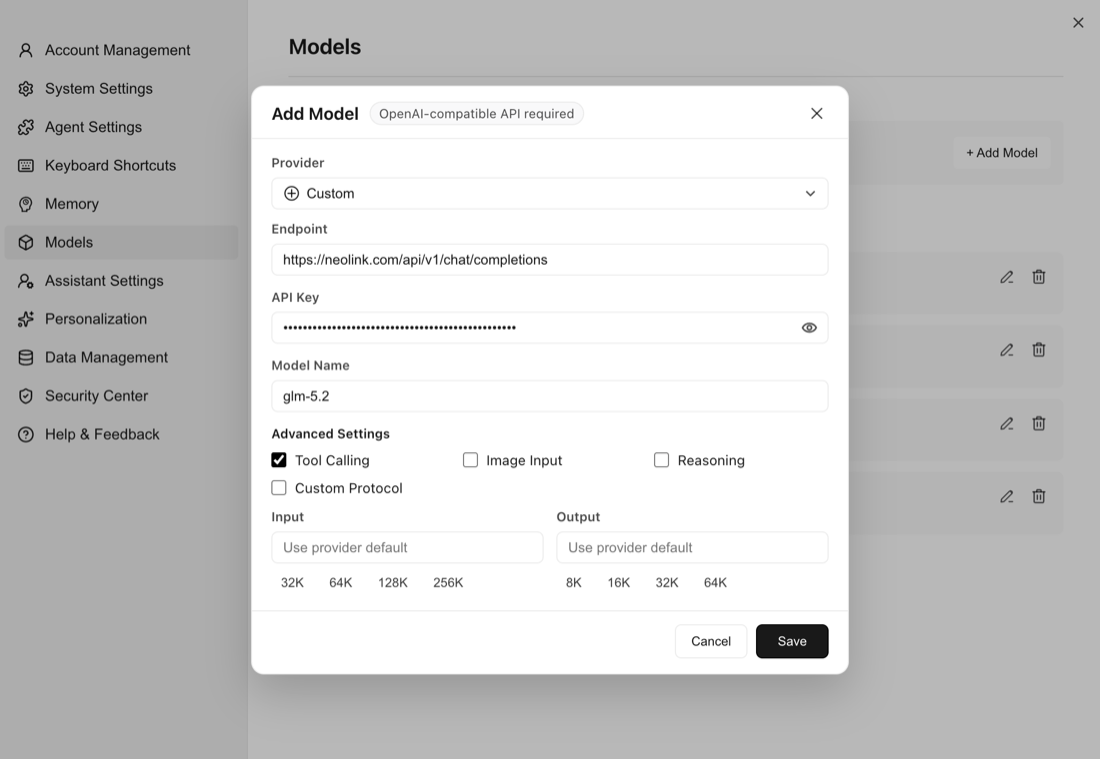
To add multiple models, repeat the steps above for each one (same endpoint URL and API Key, only the model name differs).
Method 2: Edit models.json Directly
Note that WorkBuddy and CodeBuddy use different configuration directory names (.workbuddy and .codebuddy respectively). Configuration file paths:
| Level | Path | Description |
|---|---|---|
| User | WorkBuddy: ~/.workbuddy/models.json; CodeBuddy: ~/.codebuddy/models.json (on Windows, the same directory names under C:\Users\<username>\) | Global, applies to all projects |
| Project | <project-root>/.workbuddy/models.json (.codebuddy for CodeBuddy) | Current project only, takes precedence over user level |
Example configuration (replace id with a model ID copied from the "Portal / Model Marketplace"). Each model is one entry in the models array — to add multiple models, duplicate the entry; all entries share the same url and apiKey, only id and name differ:
{
  "models": [
    {
      "id": "glm-5.2",
      "name": "GLM-5.2 (TokenSwitch)",
      "vendor": "TokenSwitch",
      "url": "https://neolink.com/api/v1/chat/completions",
      "apiKey": "your API Key",
      "maxInputTokens": 128000,
      "maxOutputTokens": 8192,
      "supportsToolCall": true,
      "supportsImages": false
    },
    {
      "id": "deepseek-v4-flash",
      "name": "DeepSeek V4 Flash (TokenSwitch)",
      "vendor": "TokenSwitch",
      "url": "https://neolink.com/api/v1/chat/completions",
      "apiKey": "your API Key",
      "maxInputTokens": 128000,
      "maxOutputTokens": 8192,
      "supportsToolCall": true,
      "supportsImages": false
    },
    {
      "id": "deepseek-v4-pro",
      "name": "DeepSeek V4 Pro (TokenSwitch)",
      "vendor": "TokenSwitch",
      "url": "https://neolink.com/api/v1/chat/completions",
      "apiKey": "your API Key",
      "maxInputTokens": 128000,
      "maxOutputTokens": 8192,
      "supportsToolCall": true,
      "supportsImages": false
    }
  ],
  "availableModels": ["glm-5.2", "deepseek-v4-flash", "deepseek-v4-pro"]
}| Field | Description |
|---|---|
id | Model ID. Must exactly match the model ID in the Model Marketplace. |
name | Display name shown in the UI. Customizable. |
url | Full endpoint path — must end with /chat/completions, i.e. https://neolink.com/api/v1/chat/completions. Note this differs from clients that take a Base URL (see "About the /v1 in the Base URL" in Cline Configuration). |
apiKey | Your platform API Key — fill it in directly. If you prefer not to store it in plain text, the ${ENV_VAR_NAME} reference syntax is also supported. |
supportsToolCall | Whether tool calling is supported. Recommended to enable. |
availableModels | Controls which model IDs appear in the model selector; separate multiple models with commas, e.g. ["glm-5.2", "deepseek-v4-flash", "deepseek-v4-pro"]. Note that not every model can be displayed and used properly in WorkBuddy — prefer chat models that support tool calling (Function Call); non-chat models such as video, image generation, or embeddings are not applicable. |
Notes:
Save
models.jsonas UTF-8 without BOM — some desktop builds cannot read files with a BOM.When using project-level configuration, do not commit a
models.jsoncontaining a plain-text key to version control.
3. Start Using
Fully quit and restart WorkBuddy, then pick the newly configured model in the model selector (custom models carry a custom tag).
4. FAQ
If you encounter an error during configuration, troubleshoot against the User Error Code Guide.
Error 401 Authentication Failed
The API Key is incorrect or expired — log in at https://neolink.com/ to verify. See HTTP 401 — Authentication Failed.
Error 404 Invalid URL
The url field must be the full endpoint path https://neolink.com/api/v1/chat/completions — stopping at /v1 or /api returns 404. See HTTP 404 — Not Found.
Model does not appear in the selector
Check in order: models.json is valid JSON encoded as UTF-8 without BOM; the model id is included in the availableModels array; the file path is correct; the app was fully restarted after changes.
5. Official Documentation
For more configuration details, please refer to:
Mainland China: https://copilot.tencent.com/docs/
International: https://www.codebuddy.ai/docs/cli/models